How to Understand Your Thermostat Wires
The primary control system for your HVAC system is the thermostat, and correctly wiring your thermostat is vital for its functioning. Whether you are considering upgrading your current thermostat or need to check for possible problems with it, understanding your wiring is critical.
While there is a wide range of thermostats that have varying configurations, learning a few key points about their wirings, such as the types of systems, color coding, and how to access your thermostat wires, can help you with testing and even an upgrade.

Removing The Thermostat Control Panel
If you need to check your thermostat wiring, fix it, or are looking to possibly upgrade or replace your current thermostat, the first step in the process is removing the control panel of the thermostat. To ensure that you are safe before checking the wire, turning the power to the thermostat off is essential.
Most wall-mounted thermostat control panels can be nudged off at the top or bottom, while some models, like Honeywell thermostats, may require screws to be removed to expose the wiring.After removing the panel, the base and wires will be sticking out of the wall, and the sockets will be visible. With many brands of thermostats, there will be eight sockets on each side. When removing the wires, you will need a flathead screw to remove them from their terminal.
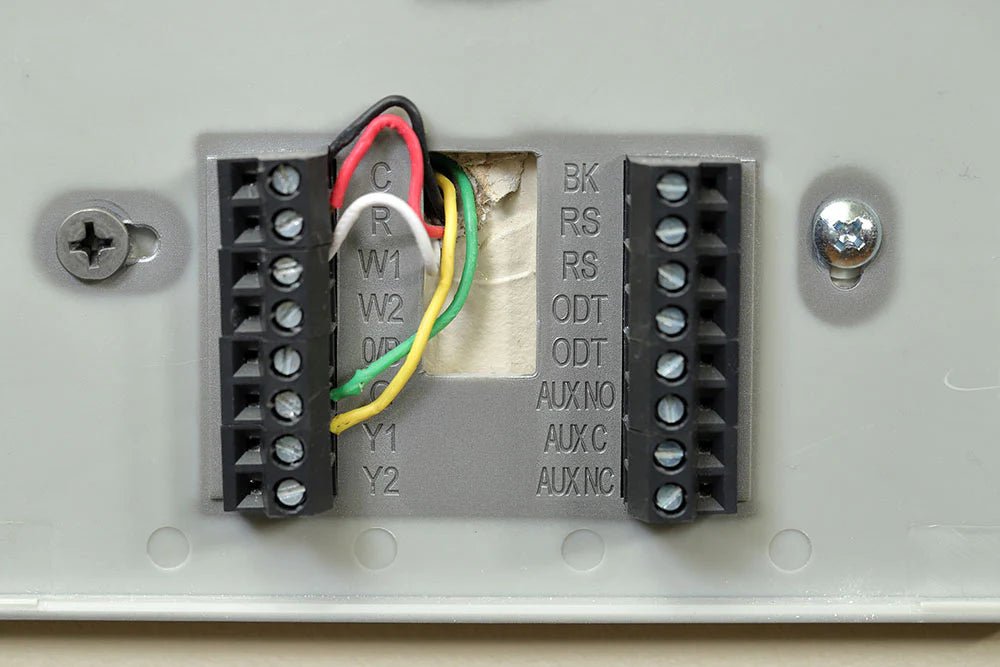
Thermostat Wire Color Codes
Once you have removed the cover to your thermostat, you will see up to 16 sockets labeled:
- C
- R
- W1
- W2
- O/B
- G
- Y1
- Y2
- BK
- 2x
- Rs
- ODT
- AUX
- NO
- AUX C
- AUX NC
Not all of these sockets may be present if you have a 2-wire, 3-wire, or 4-wire thermostat. No matter what type of system you have, there may not be wiring to each of these sockets either. If you are looking to test, re-wire, or upgrade your current thermostat, it is vital to understand what each wire is for and where it should be connected.
- Black or Blue: You will find a black or blue wire, the C wire (common wire.) The C wire completes the 24V electric circuit by connecting to the transformer. If you have a newer thermostat, the 24V circuit will be continuously looped, and if you have a newer smart thermostat, the C wire will be connected to the C terminal. If you have an older model, the circuit will only be looped when it is signaled that power is needed. Because of this, you may not have a C wire.
- Red: The red wire in your thermostat is for power. It will provide a 24-hour volt of power and will originate from the system’s transformer. Every air conditioning system will have a red power wire. In some systems with a dual transformer, there will be two: Rc wire and Rh wire.
- White: White wires, or W wires, are heating wires found in a thermostat that operates a furnace or heat pump. You will not see a white wire if your thermostat is just for an air conditioner. The wire will connect right to the heating source. If you have two-stage heating, which can be found with most heat pumps, you will see a W2 wire.
- Orange and Dark Blue: An orange wire is present with reverse valve cooling, traditionally found on large manufacturers' heat pumps. The orange wire will connect to the condenser of your heat pump, located on the outside unit. A dark blue wire or B wire is used for reverse valve heating on heat pumps. When heating mode is engaged on a heat pump, the B wire will be needed for the t-stat terminal.
- Green: The fan wire, g wire, in your thermostat will be green if you have a mini split system and will be connected to the power input in the fan of the indoor air handler units.
- Yellow: The yellow wires connected to the Y terminals will provide a connection to the compressor relay. You will typically find these wires in mini split systems as wiring to the indoor units. A Y1 wire will be present if the system is single-stage cooling and Y2 if you have a second-stage cooling system.
The Different Types of Wiring in Your Thermostat
While many thermostats have similar wires, there are various ways for the wires to be configured depending on your model of the thermostat. Always check the manufacturer’s instructions and wiring diagram before working. But in general, you will often find between 2 and 5 wires. Thermostats with over five wires or thermostats for heat pumps may have different control points. Below is what you may expect to encounter based on the different types of thermostat wiring.
2 Thermostat Wire System
A 2-wire thermostat is almost always for a system with heat but without air conditioning, controlled by a digital thermostat. The two wires are most often red for power and white for heat.
3 Thermostat Wire System
A 3-wire thermostat configuration is the most common for digital thermostats controlling boilers. The configurations will include a white wire, a 24-volt common wire, and a 24-volt hot wire.
4 Thermostat Wire System
If you have a battery-operated digital thermostat that controls only heat, you most likely have a 4-wire thermostat system. The typical configuration for a 4-wire is a white wire, a green wire, a 24-volt r wire, and a 24-volt common wire.
5 Thermostat Wire System
If you have heating and air conditioning in your home, then a 5-wire thermostat configuration will be the most typical style of your digital thermostat. This configuration includes a 24-volt red wire for power, a white wire for the heating elements, a yellow wire for the AC unit, a green wire for the fan component, and a common wire which is most likely blue but could be a different color. If you see a different configuration when opening your panel or are unsure of the wire configuration or the presence of specific wires, it is best to contact an HVAC specialist for clarification.
When to Work on Your Thermostat
If you are experiencing problems with your HVAC system starting up and are doing some troubleshooting on your own, checking your thermostat wiring may be an excellent place to start. In either case, you should only work on wiring if you are comfortable with the process. If you have never worked with wiring before or are unsure of your abilities, it is best to consult an electrician or HVAC specialist.
While it may be necessary to call in the experts if your system has problems or your wiring might be faulty, there are a few simple DIY checks and tasks that are a little simpler to perform, such as testing your thermostat or upgrading to a newer model.
Test Your Thermostat
Testing your thermostat may be necessary if you suspect it is not working correctly or might be the cause of your system’s failure to start up. If your system is not triggering to start when the temperature calls for it, you can test your thermostat in a few simple steps.
- Turn Off the Power: To safely work and inspect your thermostat wiring, you will want to ensure that the power to your furnace has been shut off.
- Remove the Thermostat Cover: You will need to remove the thermostat cover off the wall, which can usually be done by sliding it upward or downward.
- Note Where the Wires Are: Each wire should be screwed into its corresponding terminals. For example, the R (red) wire should be screwed into the R terminal. You may want to snap a picture with your phone to remember how the wires are attached.
- Remove the Wires From the Terminals: Next, you will want to unscrew the wires from their terminals using a flathead screwdriver, ensuring that the wires do not fall into the wall.
- Find the Red and White Wires: Locate the red and white wires, which are the power and heat. In some cases, they may be the only two wires.
- Twist the Wires Together: Twist the bare ends of the red and white wires together, ensuring that you do not touch them with other wires.
- Turn the Power Back On: Flip the power to the furnace. If this action triggers the blower to turn on and the furnace's burners to ignite, the wires may have been connected wrong or become defective, and you will need to replace the thermostat.
- The Furnace Burners Do Not Ignite: If the blower doesn’t turn on and the burners do not ignite, you may need to check further up the wires toward the furnace to see if any are damaged or broken. If you are uncomfortable with this, you should shut your system back off and call an HVAC technician.
- Replace and Retighten Connections: Once you have completed your checks, you need to reconnect the wires to the terminal screws and tighten them. Then replace the thermostat cover.
- Repeat for AC Unit Concerns: If you are having problems with your air conditioner, you can repeat the same process with the red power wire and the yellow cooling wire.
Upgrade to a Programmable or SMART Thermostat
Another reasonably simple DIY wiring project is upgrading your current thermostat to a programmable one or a smart thermostat like the Nest thermostat. There are many benefits to upgrading to a programmable or smart thermostat option. Some of the main advantages of choosing a new thermostat are:
- Greater control over the temperature in your home
- Newer features that allow for scheduling
- Lower utility bills
- Reduced energy consumption
Newer thermostats are also reasonably easy to install, especially if you have basic working knowledge of wiring. To upgrade your old thermostat, you will need to:
- Turn Off the Power: For safety reasons, always shut the power off to your furnace when exposing the wires.
- Remove Your Old Thermostat: Pull off the cover of your old thermostat, unscrew the terminal screws and disconnect the wires. Once this is complete, you can also pull the back plate of the thermostat off.
- Mount the Hub: You will want to mount your new thermostat hub in a convenient location and close to your furnace.
- Disconnect the Wiring to the Furnace: You will need to disconnect the wiring from your old thermostat to the furnace and transfer that wire to the new hub, screwing the wires into the designated places. The red wire will connect the R terminal, the white wire to the W terminal, and the blue wire to the C terminal.
- Mount the New Thermostat: The back-plate of the thermostat will need to be mounted on top of the old one’s location. You may need to drill new holes to accommodate different screw placements.
- Wire the New Thermostat: Use the old wires running to the furnace, wire them into the new thermostat, and connect them to the back plate.
- Turn on Your Furnace: Turn your system back on.
- Download Necessary Apps: If you install a new smart thermostat, you will want to download the required app and begin programming it according to the supplied manufacturer’s instructions.
Find Everything You Need for Your Thermostat at Superior Home Supplies
Whether you are looking for a new programmable thermostat or components to repair the wiring, Superior Home Supplies has what you need to get the job done. Check out our selection of thermostats or contact one of our knowledgeable representatives today to find out which option will best accommodate your system.